ProjectExplorer 6 for Autodesk Civil 3D
User Guide | Generating AutoCAD Drawings
Generating AutoCAD Drawings
Introduction
There are two key methods for generating 2D AutoCAD drawings from ProjectExplorer. The quickest and simplest method is to use the Quick Export to 2D AutoCAD DWG option. Alternatively, if more control is required over the content or scope of the exported drawing, or if it is likely to require updating repeatedly - an Object Set should be used to control the generation of your drawing.
Background
The purpose of the 2D drawing export function in ProjectExplorer is to allow users to generate DWG files containing simplified 2D versions of their Civil 3D content. Exported geometry should look identical in plan but be built only from "vanilla" 2D Autodesk entities. Sub-surface geometry and complex relationships that exist in the source Civil 3D drawing should be excluded from the exported drawing.
The result is a very "clean" DWG file which can be opened in any application that supports the AutoCAD DWG file format. The exported file should have the smallest possible file size. Exported DWG files from ProjectExplorer form an ideal foundation for 2D drawing production, particularly when Object Sets are used to effectively keep the exported files in sync with the source Civil 3D drawing.
Splitting the Civil 3D model into separate DWG files
The export process intentionally only supports the export of Civil 3D entities (as well as AutoCAD blocks), and is very much built around a selective approach. It's possible, using Object Sets, to automate the distribution of different parts of a Civil 3D design to separate drawings which can subsequently be brought back together as a series of XREFs in the drawing production phase.
Exported drawings are generally a fraction of the size of the original source file. Only the required layers, linetypes and fonts required to support each object selected for output are written to the exported drawing.
What to expect
All Civil 3D content which is supported by ProjectExplorer can be exported to AutoCAD DWG files. Here's an overview of what to expect in the exported drawing for some specific Civil 3D object types:
- Alignments - selecting an alignment for export will cause the alignment to be reproduced in the generated drawing as separate 2D lines, arcs, and polylines (representing spirals) for each alignment entity. Any assigned alignment labels are exported as MText and AutoCAD blocks.
- Profiles - selecting a profile for export will cause any associated profile views to be exported to the DWG file. The profile view will be reproduced using standard AutoCAD entities such as polylines, MText and AutoCAD blocks.
- Corridors - afilter may be applied when exporting corridors to include only specific baselines and specific feature lines in the exported DWG file.
- Surfaces - the way that surfaces are reproduced in the generated drawing is dependent on the surface style applied to each surface.
- Sample Line Groups - selecting a sample line group for export will cause any associated section views in the source drawing to be exported, along with the plan view locations of any sample lines which are currently drawn in the source drawing.
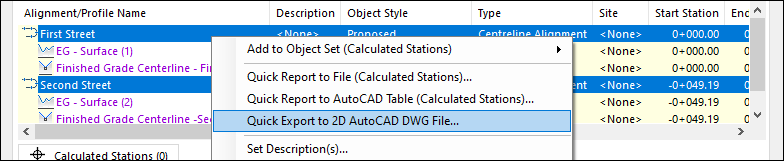
Quick Export to 2D AutoCAD DWG
To use the Quick Export to 2D AutoCAD DWG option, select one or more objects from any object list pane in the ProjectExplorer window and select one the "Quick Export to 2D AutoCAD DWG" option from the right-click menu.
Alternative DWG Export Workflow using Object Sets
Multiple 2D DWG files can be generated or updated repeatedly with a single mouse click using the Object Sets feature in ProjectExplorer.
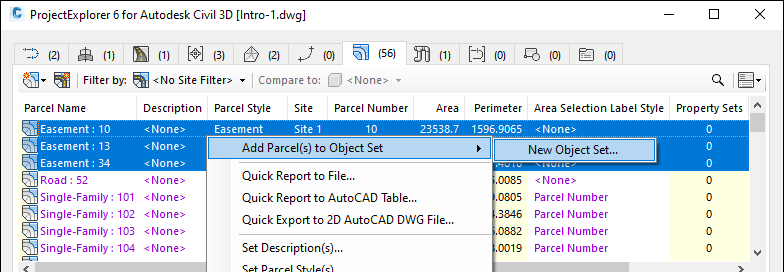
To create a new Object Set which generates a 2D DWG file, select one or more objects from any object list pane in the ProjectExplorer window and select "Add to Object Set > New Object Set" from the right-click menu.
In the Create Object Set window, set the file name, file type and output path for the DWG file that you would like to generate. The exported drawing can then be generated or updated with a mouse click on the "Run Action" button in the Object Sets tab within the ProjectExplorer window.
Read More